A compass is one of the essentials needed to survive in the wilderness in case of getting lost and not counting with accessible technology for direction. While it may seem like a difficult tool to use, it’s actually quite simple once you know the how-to of this instrument.
Learning to navigate with a compass will help you to find your way anywhere, whether you are lost or just trying to get somewhere. With a bit of guidance and a map, a compass is a powerful and reliable tool for navigation that comes with unique skills you will soon be able to master.
Interactive Compass
Setting Declination
Declination is the angle of difference between true north and the magnetic north. This is relevant because other than gyrocompasses, the needles in all compasses will always point to the magnetic north.
It is important to compensate for declination; failing to take into account the difference between true north and magnetic north can cause some issues as you plan your navigation. The longer the distance that you have to take a bearing for, the greater the issue will be.
A compass will always lead you towards magnetic north, while a map will always point towards true north. Due to this disagreement, you will want to adjust your compass to take into account the degrees of declination.
Depending on where you are the degrees of declination will change towards the west or the east. All paper maps normally count with a declination diagram, where you can find the number of degrees.
This diagram is usually found near the bottom of your map with an angle listed nearby. That angle listed will be the degree difference between magnetic north and true north.
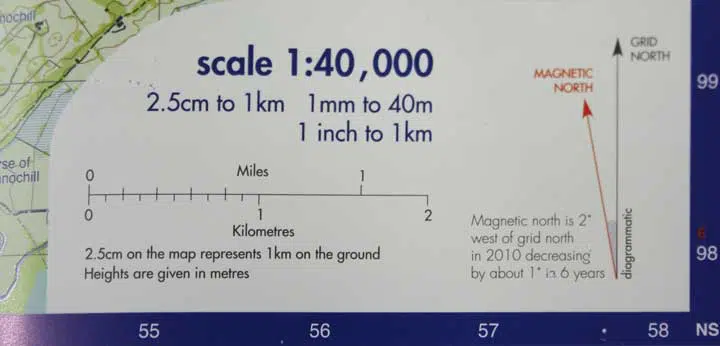
Maps will also indicate the degrees of declination that should be added or subtracted according to the year in which your map was printed and the year in which you are using it to compensate for the changes in the magnetic field fluctuations.
It is recommended that you purchase a compass with an adjustable declination for better accuracy. Each compass has its own way of setting up declination, which is why you need to follow a map’s data.
How to Set up Your Compass to Account for the Declination in Your Region
STEP 1: Find the degrees of declination on your map so you know the settings you will use.
STEP 2: Move the position of your compass so that the magnetic needle is pointing to the degrees of declination indicated on your map with the southern point of the needle. Leave the compass in a flat place while you set up your declination. You will notice that now that you have made the adjustment, the arrow pointing towards true north and the magnetic needle will be pointing in different directions. Don’t get scared, this is how it should be, but now you have to make them match by turning the screw.
STEP 3: Look for the small declination adjustment screw. This screw can be at the top or the bottom of your compass. If your compass came with a lanyard, it will have a small screwdriver attached to it. Some compasses also allow you to rotate the bezel without the need for a screwdriver.
STEP 4: Insert the screwdriver into the declination adjustment screw in order to adjust the degrees according to the declination on your map. This has to be either east or west of zero. Once the southern end of the needle is in the place of the declination degrees indicated on your map and it matches the orienting arrow on your compass, you can stop moving your screw.
You will not need to adjust the declination again until you move to a new location that has a different declination.
Take a Bearing from an Object on the Field with a Compass
Once you have already set up the declination on your compass, taking a bearing should be a piece of cake. In order to orient a map and take a bearing with your compass, you will need to align north on your map with the magnetic north on your compass, which will more than likely be pointing in different directions after the declination has been set up.
STEP 1: Lay down your map on a flat leveled surface along with your compass on top of the map. Make sure your compass is away from any metallic objects.
STEP 2: Place one of the flat sides of your compass along one of the meridian or north-to-south lines on the map. Rotate the map with the compass on top until the north side of the map is aligned with the north end of the magnetic needle. Once the alignment is in place, you can take a bearing.
STEP 3: Join your current location and your point of destination with a straight line using your compass as a ruler. In order to do so without disturbing the map, you will need to move your compass so that you can use one of the straight sides of your map between locations. Even after moving the compass, the needle pointing north should be in alignment with the north position on the map.
STEP 4: To get a bearing, rotate the dial on the compass until the orienting arrow is in alignment with the north end of the magnetic needle. This should have reset the index line, so as long as you keep the north end of the magnetic needle in alignment with the orienting arrow, you will have a direction of travel. To verify your position, make sure the orienting lines are aligned with the meridians.
Finding Your Current Location on a Map A.K.A. Resection
Resection is using a map and compass to find out where you are. This is a useful skill that is necessary to find your way when you get lost or to verify that the path you are taking during your navigation is the right one.
For resection, you will need:
- Pen or Pencil
- Topographic or Hiking map (technical survey map that shows a declination scale)
- Compass with a baseplate and a turning dial.
STEP 1: Look for at least three notable landmarks such as lakes, hills, mountains, rivers, etc. Each landmark you choose should be in a different direction from one another.
STEP 2: Point your compass towards one of the landmarks.
STEP 3: Your red needle will be pointing towards magnetic north. Turn the dial so that the north side of your dial is pointing in the exact same direction as the red arrow.
STEP 4: Go to your map and make a marking on your map where you see your landmark and place a corner of the compass on top of the landmark. You can use either the tip of your pen/pencil or the corner of the compass as a fulcrum for the next step.
STEP 5: Adjust the compass leaving the corner of the baseplate on the landmark until the magnetic needle points north towards the landmark. The north lines on your compass should line up north with the lines on your map.
STEP 6: Draw a long line along the side of the compass. You will be somewhere along that line.
STEP 7: Point your compass towards the second landmark you have chosen and go back to work on your map.
STEP 8: Find the second landmark on your map and make a marking.
STEP 9: Place a corner of your compass on top of the landmark and line it up so that the magnetic needle points north in alignment with north on your map.
STEP 10: Draw a line along the edge of the compass. This second line you just drew should intersect with the line of the first landmark.
STEP 11: Repeat steps 7 through 10 for the third landmark. The lines should make a triangle, your location will be somewhere inside of the triangle.
Get Going!
If you are just starting to learn your way using a compass, there are a couple of things you will want to take into account.
While setting up the declination on your compass, keep cell phones, watches, other electronics and even pocket knives away from the compass, as this could affect the magnetic field and give you a misreading.
If you are using a baseplate compass, always adjust and set up the declination of your compass while your compass is placed on a flat surface. The same goes to make a reading, a reading will always be more accurate if the data was taken while the compass was placed on a flat surface.
If you are using a lensatic compass, you will not necessarily have to work with a flat surface as they have an integrated leveler that will keep the magnetic needle in a precise position.
By following these instructions you will be able to get acquainted with your compass effectively, however, always practice taking a bearing and setting declination at home or somewhere local before embarking on your journey to ensure you won’t be getting lost.


