Water is one of the essential outdoor resources that we all need in order to survive in the wild.
While most people take some water on their trip, whether the trip is meant to last a couple or several days, it’s impossible to carry all of the supplies and tools you need and the weight of all of the water you will drink.
Because of this, every trip must begin with one initial goal: to find a source of water. However, finding water is not the easiest of tasks, and once you have found it, you will need to purify it before drinking it or putting it to use.
Hydration and Dehydration

Water is the main component in the human body. In order to function properly, it is necessary to stay hydrated. With a lack of proper hydration, the human body will consequently suffer from serious heart, kidney, and brain failure, causing certain death. So, what does it mean to stay hydrated and how can you keep your body safe from dehydration? Let’s explore these states of the body.
Hydration
Every cell in our bodies requires water in order to survive and function properly. So that our organisms can stay hydrated, the famous recommendation is to drink six to eight glasses of water per day. However, you may have noticed that even on days when you don’t drink six to eight glasses of water, you seem to manage just fine without having organ failure. Why is that?
Everyone needs a different amount of water to stay hydrated, there is not a one-size-fits-all recommendation when it comes to drinking water. What is definitely sure is that our bodies receive water from more than one source, which means that you don’t necessarily have to drink water directly to stay hydrated.
Our bodies receive a contribution of water intake by eating fruits and vegetables as well as drinking other liquids such as teas, milk and even soda. To stay hydrated, listen to your body and drink water every time you’re thirsty.
Staying hydrated is such an essential part of survival because it’s not only about quenching one’s thirst. Water is the element our bodies need to move rationally and aid in the function of our organs and muscles. This is why it is so important to stay hydrated, not only during an outdoors excursion.
Dehydration
Water is lost in our bodies through the production of energy. As long as you’re not replenishing your water intake, your body can easily dehydrate by a means of moving or simply living. Dry air, the heat, and the cold are also factors that can also contribute to speed up the process of dehydration.
Being thirsty is the basic indicator that you need to up your game with your liquid intake, but if you go on for too long without drinking water or liquids, your body will have catastrophic symptoms in no time. Although you should listen to your body, it’s important to prevent dehydration by consuming enough water before your body gives you a thirsty signal.
Some of the most notorious symptoms of dehydration are thirst, dry mouth, light-headedness, little to no urine, fatigue, sluggishness, muscle cramps, changes in heart rate, body temperature and blood pressure.
If you do happen to get dehydrated during an outdoor trip, it’s important to pace yourself as you replenish your water intake. Drinking too much water too quickly can cause your body to go into shock if you are severely dehydrated.
Avoiding Loss or Absence of Water
As you plan on going outdoors, you need to also make sure you have your water sources well-identified before your trip. You will need to ensure you have enough water for your entire trip or until you reach a water source, at least.
No matter how long your trip lasts, it’s important to find a water source immediately the first day that you arrive. That should be one of your first priorities because as the days go by, you will grow weary and your functionality will decay to allow you to look for a water source continuously.
It’s important you have a checklist of items you need to take with you on your trip so you can treat water found in the wild. Why is this necessary?
Water found in nature may contain bacteria and chemical products. While we can kill bacteria, we cannot remove pesticides or other chemicals. The further the source of water is from civilization, the better. As you will have a better chance of having access to water that has not been contaminated by human waste and residue.
Spotting a Water Source Without a Map
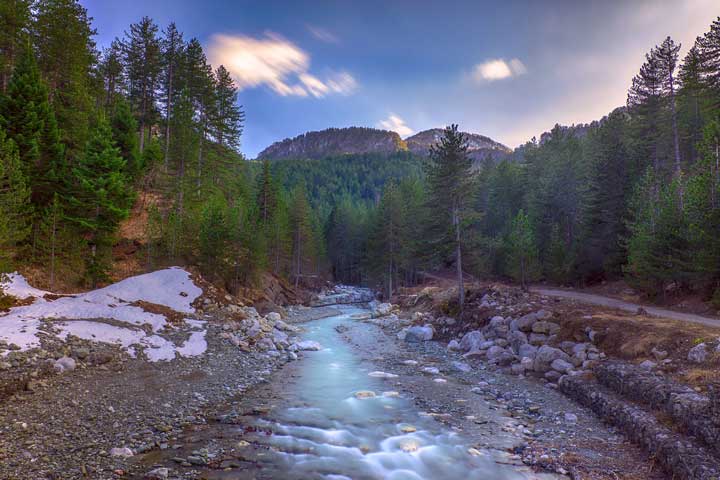
Maps are of course your best friend to route your trajectory, however you may come across the issue that the destination you’ll be going to does not seem to have any natural water sources such as rivers, lakes or streams appear on the map – but that doesn’t mean there aren’t any water sources around.
One of the biggest problems with paper maps is that they may not always be up to date, which leaves you with the task to find out how to locate water sources that may not be presented on a map.
In such cases, your best bet is to try to find the places from where the local wildlife drinks from. If you come across an animal during your trip, that’s a good sign that there is water access nearby, as animals tend to never stray too far from water sources.
While bugs may not be a welcome sign during your camping trip, or ever, when it comes to finding water, bugs may just be the thing you need. Insect swarms are a good sign that there is water nearby, as that’s where they tend to reproduce.
Another peculiar sign to look for is the flight-pattern of birds early in the morning or in the evenings right before the sun sets. This is because birds tend to fly towards a water source at these times of the day. So, try to observe the direction in which birds fly from your shelter as a guide.
As you look for water, gravity is going to be your best guide. Water flows downhill, so if you find yourself uphill, continue your search going downwards. This could lead you to finding a valley, ditch or gully. It is more likely to find an empty ditch or gully uphill.
If you do happen to find a ditch that appears to be empty, consider that while it may seem dry on the surface, there could be water just underneath. If you dig, you may be able to access some water.
Rain Water
Depending on the location and the season, rain can provide you with the water you need if you know how to collect and store it.
The beauty of rainwater is that it requires very basic purification. The more remotely you find yourself, the further away you will be from pollution, which in theory could give you cleaner and less contaminated rainwater.
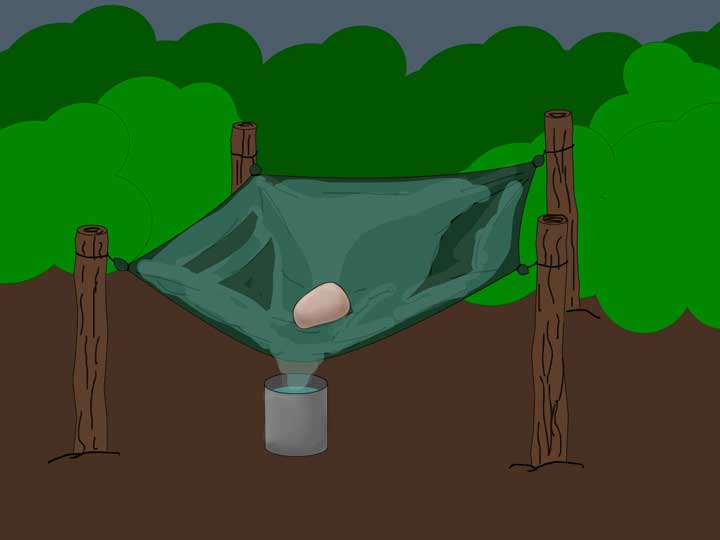
Rainwater can be collected by using a tarp, poncho, piece of plastic or even leaves and foliage for the rain to fall on, a container where the water will be collected, and cordage.
A tarp can be held up off the ground with four branches that will hold each corner of it. The branches must support the tarp in a steep position so that the water can drop into the container. To guide the water, place a few stones on the lower side of the tarp to guide the water to fall on the container below.
As you set up your tarp or foliage to collect water, place it a way in which the most water will be able to fall on the bucket in order to have as little waste as possible.
If you don’t have a container, you can make one out of bark from a tree, which can be taken from any logs you find or directly from a tree. To see how you can avoid this mistake, take a look at the video below.
Collecting Dew
Collecting dew may seem like a good way of acquiring water, however if you are not familiar with venomous plants, this should not be an approach you should take to collect water.
If you are familiar with venomous plants, then you can consider collecting dew as a means of water acquisition by using t-shirts. This method could help you collect up to a quarter of a gallon, or one liter of water within one hour.
How do you accomplish this? A piece of absorbent cloth or a t-shirt is tied to each of your ankles so that you can walk around the grass in the early morning, collecting the morning dew from the plans by a means of absorption into the fabric.
Once the fabric is damp, you can squeeze the water into a container if you are confident that you did not collide with any poisonous plants.
Tapping Water from Trees
During the months of March through May, you can collect water by tapping trees. However, to try this trick you will need to be familiar with poisonous plants just as if you were attempting to collect water from morning dew.
Sycamore and maple trees are good sources of water because it is during the spring when the sap starts to rise in the trees. The sap can be collected to be drunk by tapping the tree. The sap collected is known as Sycamore Water or Maple Water.
To tap a tree you will need your survival knife and to follow the next steps:
- Test to see if the sap is running in a tree by making a small hole or incision in the tree.
- Once you have established there is sap, carve a hole on the channel the same width as the container where the sap will be dropping into.
- Be sure to clear out any wood shavings inside of the hole before you start collecting the sap.
- Use a small branch to fit into the hole you just carved and use it as a vessel to direct the sap to drip into your container.
Collecting Water from Plant Transpiration
To take advantage of plant transpiration as a means to collect water, you will need some Ziploc bags, or something of the like.
As mentioned before, any time of water collection that you may do requires plant knowledge to differentiate between poisonous and non-poisonous plants. This method to collect water is not the exception.
In order to collect water from plant transpiration, you will need to:
- Find leafy, non-venomous plants.
- Wrap the plants inside of a bag, sealing it as much as possible.
- Do not remove the branches from the plants.
After a few hours under the sun, the plants will create condensation that will be collected by the bags. Some people add stones to the bags to draw the condensation to fall on the stones, however as very little water is collected, you would have to suck the water directly from the stones to not waste any collected water.
Collecting Water through a Solar Still
Another way of collecting water through condensation is to use a solar still with a transpiration method. There are many different types of solar stills, however they all serve the purpose of collecting water and purifying it in places where water is not easily attainable.
A solar still is meant to distill water by using the heat of the sun to dissolve substances and evaporate water so that it can be collected as pure water.
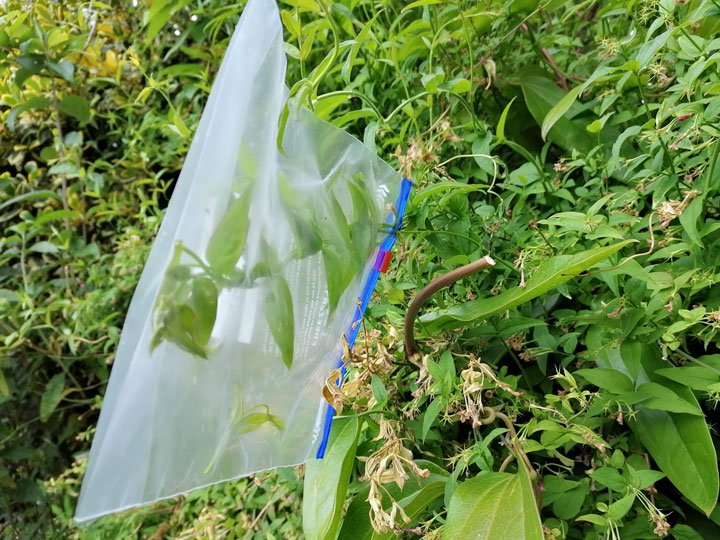
During photosynthesis, plants lose water through a process called transpiration. A clear plastic bag sealed around a branch allows photosynthesis to continue but traps the evaporating water causing the vapor pressure of water to rise to a point where it begins to condense on the surface of the plastic bag. Gravity then causes the water to run to the lowest part of the bag. Water is collected by tapping the bag and then resealing it. The leaves will continue to produce water as the roots draw it from the ground and photosynthesis occurs.
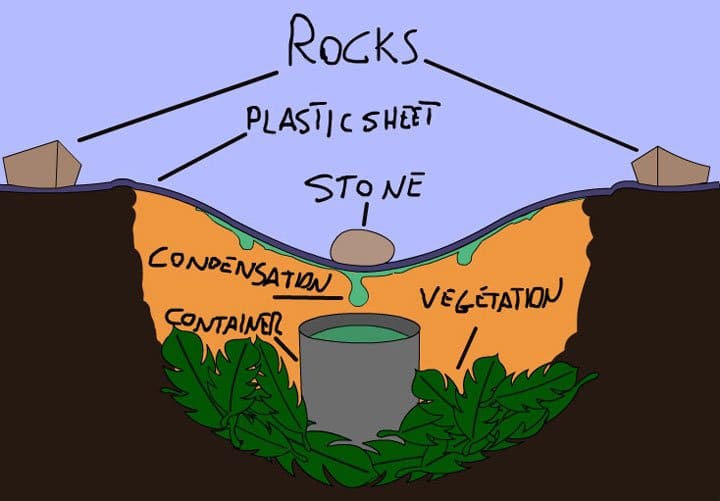
The transpiration method to distill water is accomplished by using a plastic sheet over leafy non-poisonous vegetation that is placed inside of a hole. The plastic sheet must seal the hole completely to prevent the loss of water vapor, which causes the condensation to happen.
With the model of a solar still presented on the image shown, a simple solar still is built by digging a hole and placing plants inside of it. In the middle of the hole, there should be a container that will collect the condensation.
Another way of creating a simple solar still is by simply placing a plastic bag over the branch of a non-poisonous tree. The sun will cause photosynthesis, which will create condensation that will be collected within the bag. Gravity will drive the condensation to the ground, so you must ensure that the bag is properly sealed while using this method.
Finding Water in Different Environments
Any of the previously taught strategies can be tweaked to help you collect water according to your environment. However, the terrain will most definitely affect the way in which you will need to search for water and how likely you are to actually find it.
Finding Water in a Tropical Island
When one thinks of an island, a lack of water is probably an idea that may not run through anyone’s head as you will inevitably be surrounded by the ocean. However, finding drinking water is a completely different story.
Unless you happen to be on a desert island, you will find that islands have their own source of sweet water. At first look, the easiest thing you can do to find water is to walk inland and listen for any streams of water.
Fruits such as coconuts should be readily available inland, which could be a good source of water. However, you must be careful of the fruits you acquire your liquids from as they could have side effects that would help to dehydrate you rather than hydrate. Coconut water, for example, found inside coconuts can be a good way of quenching your thirst, but drinking large amounts of coconut water actually has a laxative effect, causing you to dehydrate faster.
Desalinating water is a great way in which you can make a good use of resources found in an island. To desalinate water you will need to boil seawater and collect the water produced by the stream of the boiling water.
Collecting rain and digging for water can also be good ideas to follow, but always try to find a steam of running water, as this will be a more plentiful source to suit your survival needs.
Mountains During the Winter
During the winter, mountains will have an abundance of snow, which can be a good source of water. Snow can be melted by boiling it or warming it up with your own body temperature. Warming up the water is of course necessary to turn snow into drinkable water, however, it is also always better to have a warm liquid intake. Drinking cold water requires more energy as your body will automatically begin to warm it up, and in a survival situation, you want to save as much energy as possible.
Just because the snow came from the sky, it doesn’t mean it’s clean. Make sure any snow you use as a source of water is clean and not brown or yellow of color.
Along the hike of your trip you can also come across some hidden creeks, which would likely be frozen during the winter. If you come across one of these frozen jewels, you can attempt to obtain water from here as well.
Finding Water in a Desert
A desert, being the environment most scarce in water is the one place on earth where you don’t want to run out of water. Because of the heat and lack of water sources, your ways of collecting water will become much more limited.
The easiest way of obtaining water is by a means of condensation being collected from a metal surface. In order to do this, you will need to leave all of your metallic objects outside of your shelter overnight.
You have more than likely experienced this method in daily life unintentionally. When drops of water quickly form on the outside surface of a can of cold soda as soon as it comes out of the fridge, that’s what water condensation on a metal surface looks like.
The key factor for this method to work is cool temperature. In order for vapor to precipitate into a liquid form, it must condense on a surface that is cooler than the surrounding air in the environment, for instance, your survival knife. Although the days in the desert are hot as can be, the nights are also sharp and cold reaching up to 24°F or -4°C.
Due to the cold nature of metal, it will be a natural conductor for vapor to condense into liquid. The water must then be collected in the morning before the sun comes out and quickly evaporates it.
Keep in mind this method takes all night to take effect and will create very little water. You can also try to follow insects and animals to see if they guide you to their water source.
There are certain myths that come with the need of drinking liquid in the desert that must be avoided at all costs if possible.
Myths
With every ultimate survival experience comes a story about extreme solutions people turn to when it comes to replacing water due to the lack of the valuable H2O. It is precisely these types of stories that create myths about what you should drink in an extreme survival experience. The most common myths you will hear are:
- Drink Alcohol
- Drink Urine
- Drink Blood
- Drink Seawater
Although these are common myths, they are not safe to follow and should be avoided at all costs.
Along with dehydration, alcohol affects your judgement and level of perception. As needing water in the desert is an extreme survival situation, you will need to stay as sharp as possible.
When it comes to drinking urine, we cannot help but to think of Bear Grylls drinking his own urine as a means of survival in the desert. Although this is an alternative, it should not be done except in desperate cases where you need to have some sort of liquid intake urgently.
Drinking blood comes without explaining that rather than helping, it could cause you to quickly become ill. The spread of disease is the most immediate danger by drinking blood, however as blood is rich in iron you run the risk of developing an iron overdose. Although iron is necessary in your body, excess of iron can be toxic. Iron overdose is known as a condition called hemochromatosis, which besides dehydration it also causes low blood pressure, nervous disorders, fluid buildup in the lungs and liver damage.
If you find yourself in a desert near the ocean, you may think you are saved. However, you may want to think twice. Seawater is rich in salt, which causes dehydration quickly. To put this into perspective, you may want to think about the principle of curing ham, which requires large amounts of salt. During the curing process, salt absorbs liquids from the meat which kills bacteria as it cannot survive without any water.
How to Purify Water
Purifying water is the process of removing any contaminant from water in order to make the water fit to drink or use for a specific purpose.
There are many ways to purify water, but an accessible way of doing it is by using sand, charcoal and containers to make the filter and to collect the water. You will need plenty of charcoal, which is why it’s recommended to save charcoal that is made from previous fires.
This sometimes makes water shift in the third position of the list of essential things that you need to survive:
Building the Filter
In order to build a filter you will need the following items:
- Sand
- Small Gravel
- Charcoal
- 1 Empty Water Bottle (to be cut out and use as the filter)
- 1 Empty Water Bottle or Container (to collect the filtered water)
- Filtering Cloth or Tissue (a strand from a t-shirt can be used)
Preparation:
As sand, clay and rocks have different densities, they must be separated. You can do so by using a strainer or by putting them in a container with water and stir it all up after the water is poured. This will cause the rocks to fall to the bottom due to their weight. The sand will be on top of the rocks or stones and finally the clay will be on the top.
Once everything has set, you will notice that any other organic material will float to the top, and then you’ll want to pour out the water carefully without mixing everything up. This will allow you to skim off the top layers that floated to the top.
Before starting, you will also need some crushed up charcoal, which you can take from previous fires you may have made on past trips. Otherwise, you can consider saving up your charcoal on future trips. When crushing up the charcoal, make sure you make it as fine as possible. The finer the charcoal powder is, the better the filter will work.
Before beginning, it’s a good idea to let the water sit for at least an hour, so that gravity can separate some of the heavier organic stuff in the water. That way whatever settled at the bottom will not come out with the water, helping the filtering process.
Procedure:
- Take one of the plastic bottles and cut off the bottom.
- Place a tissue at the bottom of the opening of the bottle (where the bottle cap or funnel shape is). The tissue is meant to catch everything that sips through it.
- On top of the toilet paper, you will want to fill up the bottle with one third of charcoal, one third of sand and one third of pebbles in that order.
- The bottom of the bottle that was cut out should be cut to turn it into a baffle.
- Once cut out, place the baffle on top of the pebbles to reduce erosion.
- Slowly pour the water into the filter and wait for the water to trickle down.
- Once the water has been filtered, it must be sterilized by boiling it, using UV air sticks or water purification tablets.
Tip
Water is commonly believed to reach boiling point at 100°C, however depending on altitude the pressure the boiling this will change. Keep an eye on the water and make sure it boils for a couple of minutes before drinking it. The higher the altitude, the longer you will need to boil the water to kill the bacteria.
You can see a sample of how to create a filter in the video below:
Finding a Way
Although there are several ways to get water from nature, your safest bet always lies in planning ahead. You will need to plan not only on taking enough water to begin your trip, but also on the location of water sources such as rivers, lakes and streams.
Remembering these simple methods to collect water as well as filtering and purifying the water will help you to be prepared an

